


How to Install RFID Tags on Different Equipment Types (Metal, Plastic, Glass)?
You’ve finally bought your first batch of RFID tags for equipment. They arrive in a small box, and you’re excited to start tracking everything. Then you walk out to the shop floor, look at your gear, and freeze.
One forklift is made of thick steel. Another piece of equipment is a plastic shelving unit. And there’s a glass-front display case full of delicate instruments. Can you stick the same tag on all of them? Absolutely not. But don’t worry – I’ve messed up enough installations to save you the trouble.
Let me show you exactly how to install RFID tags for equipment on metal, plastic, and glass. Do it right the first time, and your read rates will stay high, your tags won’ fall off, and you won’t be the person standing there with a reader that sees nothing.
Why the surface material actually matters
Here’s something that isn’t obvious until you try it. RFID tags work by sending and receiving radio waves. Different materials reflect, absorb, or pass through those waves in totally different ways.
Metal reflects radio waves like a mirror reflects light. That can bounce the signal away or create interference. Plastic is usually fine, but some plastics have carbon or metallic additives that kill the signal. Glass is actually pretty friendly to radio waves, but glass surfaces are often smooth and hard to glue things to.
So the way you install RFID tags for equipment has to change based on what you’re tagging. The good news is that once you learn the tricks, it becomes second nature.
Installing on metal – the tricky but doable one
Metal is the boss level of RFID installation. If you take a standard sticky-backed tag and slap it directly onto a steel toolbox, the tag will detune. Its read range might drop from ten feet to six inches. Sometimes it won’t read at all.
The fix is simple once you know it. You need on-metal or “mount-on-metal” RFID tags for equipment. These tags have a special layer between the antenna and the back of the tag. That layer blocks the metal’s interference. They cost a little more, but they actually work.
When you install on metal, clean the surface first. Wipe off grease, dust, and loose paint. Use rubbing alcohol if you have it. Then peel the liner and press the tag firmly for about ten seconds. Pay extra attention to the edges – they like to lift if the surface is curved.
If the equipment vibrates a lot, like a compactor or a conveyor motor, don’t rely on adhesive alone. Get tags with mounting holes. Use a stainless steel zip tie or a small rivet. I’ve seen adhesive tags fall off a vibrating screen in two days. Bolted tags stay on for years.
Another pro tip: avoid placing the tag in a recessed area or near sharp metal edges that can reflect signals in weird ways. The flattest, most accessible spot is usually the best. And never mount the tag directly over a weld seam – the uneven surface breaks the adhesive seal over time.
Installing on plastic – easier, but watch for the hidden traps
Plastic is generally kind to RFID signals. Most standard RFID tags for equipment work fine on plastic surfaces. But not all plastic is the same.
Clear polycarbonate? No problem. ABS plastic? Works great. But some industrial plastics are filled with carbon fiber or conductive materials to make them stronger or static-dissipative. Those will mess with your signal just like metal does.
So before you install, do a quick test. Hold a tag against the plastic surface and scan it with a reader from a few feet away. If the read range seems normal, you’re good. If it drops sharply, you’ve got conductive plastic. In that case, treat it like metal and use on-metal tags.
Installation on plastic is usually straightforward. Clean the surface. Peel and stick. But plastic equipment often lives in dirty environments – think plastic totes in a warehouse or plastic toolboxes on a truck. Wipe off any mold release residue from manufacturing. That stuff is slippery and will ruin the adhesive.
For plastic equipment that gets washed frequently or exposed to chemicals, choose RFID tags for equipment with aggressive adhesive, like a VHB tape or a two-part epoxy patch. I once stuck standard tags on plastic chemical drums. Two weeks later, half of them were floating in a puddle of solvent. Don’t do that.
If the plastic surface is textured or pebbled, smooth adhesives won’t get enough contact. Use a tag with a foam backing – it conforms to the bumps and grips better. Or go with a mechanical mount if the equipment has existing holes or slots.
Installing on glass – surprisingly simple, with one big caution
Glass is actually one of the best surfaces for RFID. Radio waves pass right through it. So you don’t need special tags. Standard RFID tags for equipment will perform beautifully on glass windows, display cases, or glass-front gauges.
But glass presents a different problem: keeping the tag attached. Glass is smooth, non-porous, and often cold or wet. Many adhesives struggle.
First, clean the glass thoroughly. Use glass cleaner or alcohol. Remove any soap film or fingerprints. Then let the glass dry completely. If it’s cold outside, warm the glass slightly with a hair dryer or by parking the equipment in the sun for a few minutes. Adhesive flows better on warm surfaces.
When you apply the tag, press firmly from the center outward to push out air bubbles. Glass is unforgiving – any bubble becomes a weak point that lets moisture in.
For glass equipment that lives outdoors, like a glass-faced meter or a window on a control panel, consider RFID tags for equipment with UV-resistant adhesive. Sunlight breaks down many standard glues within a year. There are special outdoor-rated tags for exactly this situation.
One more thing about glass: it breaks. If you’re tagging fragile glass equipment, don’t put a heavy or rigid tag that could act like a hammer when the equipment shifts. Use a thin, flexible tag. Some are as thin as a sticker. They add no stress to the glass.
What about mixed-material equipment? It happens more than you think
Here’s where it gets real. A single piece of equipment might have a metal frame, plastic panels, and a glass display. Which surface do you put the tag on?
Rule of thumb: put the tag on the largest, most accessible non-metal surface if possible. If the metal frame is the only practical spot, use an on-metal tag. Never bridge a tag across two different materials – the gap or the material change can detune it.
For example, a medical cart might have a metal base and a plastic top. Stick the tag on the plastic top. A vending machine is mostly metal, so use an on-metal tag on the side. A lab freezer has a metal body and a glass door – put the tag on the metal body with an on-metal tag, because the glass door opens and closes, which could change the read angle.
I’ve also seen people successfully install RFID tags for equipment on the plastic handle of a metal tool. That works fine as long as the handle isn’t too small. But if the handle flexes, the tag might pop off. Test it by bending the handle.
The adhesive is half the battle – choose wisely
You can have the best tag in the world, but if the glue fails, the tag falls. And a lost tag is worse than no tag, because you think you’re tracking something but you’re not.
For most equipment, a good acrylic adhesive is fine. For rough surfaces, look for foam-backed adhesives. For high heat, you need silicone adhesive. For cold storage, there are low-temperature formulations.
Here’s a quick mental checklist before you peel any liner:
Is the equipment vibrating? Use mechanical mount or foam adhesive.
Is the equipment outdoors? Use UV-resistant and waterproof adhesive.
Is the surface oily or dusty? You must clean it first. No shortcuts.
Will the equipment be washed with pressure sprayers? Use epoxy or a tag with an overmolded housing that seals the edges.
I learned this the hard way when I tagged a fleet of pressure washers. The labels looked great on day one. After the first wash, half of them were gone. The ones that remained had water under the adhesive. We had to scrape them off and start over with fully encapsulated tags that bolted on.
Placement matters almost as much as the tag itself
Where you put the tag on the equipment changes how well it reads. Don’t just stick it anywhere convenient.
Avoid corners and edges. Radio waves can diffract around corners, but not reliably. Put the tag on a flat, central area if possible.
Keep tags away from other metal objects. If you’re tagging a metal cabinet, don’t put the tag right next to a metal handle or hinge. Give it a few inches of clear space.
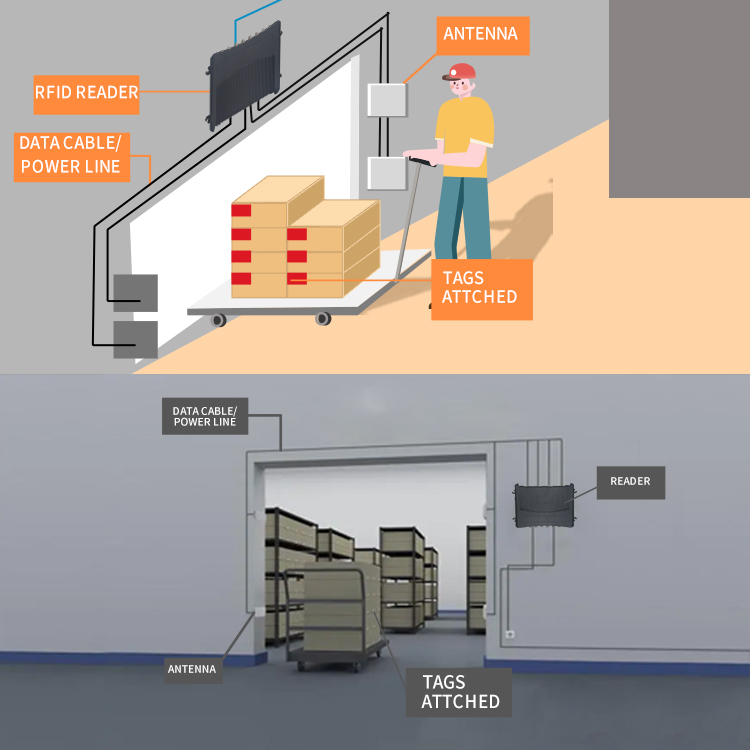
For equipment that gets stacked or stored close together, put tags on the side that faces the aisle. That way, someone walking by with a handheld reader can scan without moving things.
For plastic totes that nest inside each other, put the tag on the short end, not the long side. Nested totes often cover the long sides completely. The short end stays visible.
Testing your installation before committing to a thousand tags
You’ve installed one tag on a metal beam. It reads from eight feet away. Great. But don’t go tag everything yet.
Walk around the equipment at different angles. Scan from above, below, left, right. Try scanning while holding the reader at waist height and while holding it near the ground. Real life isn’t perfect. Workers will scan from weird positions.
If the tag fails at certain angles, move it a few inches and test again. Sometimes two inches makes all the difference.
Also test after the equipment has been used for a day. Vibration and temperature changes can shift the tag or loosen the adhesive. Come back a week later and scan everything again. The tags that survived are your winners.
A story from a job site that taught me everything
A few years ago, I helped a construction company tag all their portable generators. The generators had metal frames, plastic fuel tanks, and rubber feet. We chose standard RFID tags for equipment and stuck them on the plastic fuel tanks. Perfect, we thought.
Two months later, half the tags were gone. Why? The fuel tanks vibrated constantly. Also, gasoline vapors and spilled diesel attacked the adhesive. The tags didn’t fall – they dissolved from the bottom up.
We switched to on-metal tags bolted to the metal frame. Away from fuel, away from vibration flex. Those tags are still there today, three years later. The crew can walk down the row of generators and scan every single one from five feet away.
That experience changed how I think about installation. It’s not just about what surface you use. It’s about what that surface goes through every single day.
Quick summary for the real world
If you take nothing else away from this, remember these three rules:
On metal: use on-metal tags, clean the surface, and bolt them if possible.
On plastic: standard tags usually work, but test for conductive fillers first.
On glass: standard tags work great, but use strong UV-resistant adhesive.
And always, always test a few before you tag everything. Your future self will thank you.
Now go grab that box of RFID tags for equipment and start installing with confidence. Your equipment is waiting to be found.
Have a tricky installation we didn’t cover? Reach out to our team. We’ve tagged everything from steel shipping containers to glass beakers, and we’re happy to share what worked.